Imagine a world where your PC runs smoother than a silk river, where your gaming sessions are as cool as a winter breeze, and where performance reigns supreme. Sound like a wild dream? Not anymore! Welcome to the intoxicating realm of custom liquid cooling loops, where the boundaries of greatness are pushed to unimaginable heights. Whether you’re an avid gamer, a devoted content creator, or a tech enthusiast yearning to unleash your PC’s full potential, this step-by-step guide is your golden ticket to constructing the machine of your dreams. So buckle up, grab your toolkit, and join us on an exhilarating journey as we dive headfirst into the captivating world of custom liquid cooling loops, where digital wonders await your command.
Choosing the Right Components: Key Considerations for a Custom Liquid Cooling Loop
When it comes to creating your dream PC with a custom liquid cooling loop, choosing the right components is crucial. With numerous options available in the market, it’s essential to carefully consider your requirements to ensure optimal performance and longevity of your cooling system. Here are some key factors to keep in mind while selecting the components for your liquid cooling loop:
- Compatibility: The first thing to consider is the compatibility between various components of your cooling loop. Ensure that the water blocks, radiators, pumps, fittings, and tubing are all compatible with each other and fit well within your PC case.
- Performance: To achieve efficient cooling, choose components that are capable of handling the heat generated by your PC’s hardware. Look for water blocks and radiators with high heat dissipation capabilities, powerful pumps for optimal water flow, and high-quality tubing and fittings that minimize coolant leakage and pressure drops.
- Noise Level: Depending on your preference, consider the noise output of your liquid cooling loop. Quieter fans, pumps, and water blocks can enhance your overall PC experience, especially if you prioritize a silent environment during heavy usage.
By carefully considering the compatibility, performance, and noise level, you can confidently select the right components for your custom liquid cooling loop. This will ensure that your PC stays cool under pressure, enabling you to maximize its performance and enjoy seamless gaming, graphic design, or any other intense computing activities you undertake.
Designing an Efficient Loop: Tips for Maximizing Cooling Performance and Aesthetics
When it comes to building your dream PC, having an efficient custom liquid cooling loop can not only enhance your system’s performance, but also make it a visual masterpiece. In this post, we will dive into the art of designing an efficient loop, sharing valuable tips for maximizing both cooling performance and aesthetics.
1. Plan Your Loop with Precision:
– Before embarking on your custom liquid cooling journey, take the time to carefully plan your loop design. Consider the placement of components, tubing, and radiators to ensure optimal cooling efficiency and a clean aesthetic.
– Use high-quality components, such as reliable water blocks and efficient pumps, to guarantee the best cooling performance. Make sure to research and choose components that are compatible with your system’s specifications.
2. Optimize Your Flow:
– To maximize cooling performance, it is crucial to achieve an efficient flow within your loop. Make sure the coolant passes through each component in the most logical and effective order. For example, it is generally recommended to cool the CPU before the GPU, as the CPU is typically the hottest component in the system.
– Minimize sharp bends and unnecessary tubing length to reduce flow restriction. Using larger diameter tubing can also help maintain a smooth and unrestricted flow. This will not only improve cooling performance but also enhance the overall aesthetics of your loop.
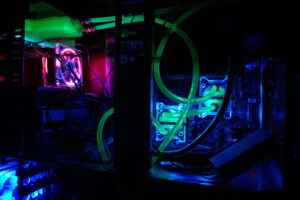
3. Create a Visual Masterpiece:
– While focusing on cooling performance, don’t forget about the visual appeal of your custom liquid cooling loop. Use vibrant and complementary coolant colors to add a touch of personality and uniqueness to your system.
- Consider incorporating LED lighting and transparent panels in your build to showcase your loop’s exquisite design. Strategic placement of lighting can highlight key components and create a stunning visual impact.
– Attention to detail is key when it comes to aesthetics. Ensure your tubing runs are neat, precise, and free from kinks. Utilize fittings, such as 90-degree angles, to achieve clean and professional-looking bends. Take your time during the assembly process to ensure a visually pleasing result.
By following these tips, you can not only achieve optimal cooling performance for your dream PC but also create a work of art that will be the envy of every computer enthusiast. So, roll up your sleeves, let your creativity flow, and embark on your custom liquid cooling journey to build the PC of your dreams.
Building Your Loop: Step-by-Step Assembly Guide for a Custom Liquid Cooling System

In this comprehensive guide, we will take you through the step-by-step process of building your very own custom liquid cooling system for your dream PC. Building a custom loop can be an exciting and rewarding experience, bringing extraordinary cooling performance and a touch of personalization to your rig. Whether you are a seasoned builder or a novice enthusiast, this guide has got you covered!
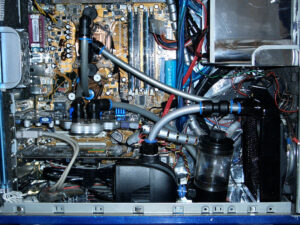
First and foremost, it is essential to gather all the necessary components for your liquid cooling loop. You will need a high-quality radiator, a compatible pump and reservoir combo, water blocks for your CPU and GPU, tubing, fittings, coolant, and a few handy tools. Make sure to choose components that are compatible with your PC’s specifications and will meet your cooling needs. One of the key advantages of a custom loop is its flexibility, allowing you to tailor the cooling system to your liking.
Next comes the installation process, and we recommend starting with the CPU water block. Begin by carefully cleaning the surface of your CPU with isopropyl alcohol, ensuring it is free of any residue that may hinder heat transfer. Apply a thin, even layer of thermal paste to the CPU and attach the water block, securing it firmly in place. Then, it’s time to move on to the GPU water block. Follow the manufacturer’s instructions to safely remove the stock cooler, clean the GPU’s surface, and install the water block using the provided screws. Remember to connect the water blocks to the pump and reservoir combo using appropriate tubing and fittings, creating a closed-loop system.
Lastly, it’s time to fill and bleed your custom liquid cooling loop. Carefully pour the coolant into the reservoir, making sure to avoid any spills. Start the pump and closely monitor the flow of coolant through the loop, looking out for any possible leaks. It is recommended to run the system for around 15-30 minutes to allow any air bubbles to escape and achieve optimal performance. Regular maintenance, such as periodic coolant replacement and checking for leaks, will ensure your custom liquid cooling system operates flawlessly for years to come, keeping your PC running at peak performance.
By following this step-by-step guide, you are well on your way to creating a visually stunning and high-performance custom liquid cooling loop for your beloved PC. Take pride in your craftsmanship as you witness the remarkable cooling capabilities of your system in action. So, unleash your creativity and embark on this exciting journey to build a custom liquid cooling loop that perfectly matches your unique vision. Happy building!
Note: Remember to refer to the specific instructions provided by your component manufacturers, as they may have unique installation requirements for their products.
Maintenance and Troubleshooting: Ensuring Longevity and Performance of Your Liquid Cooling Loop
Once you have successfully assembled your custom liquid cooling loop, it is important to understand how to maintain its longevity and optimize its performance. Regular maintenance and troubleshooting can help prevent issues down the line, ensuring your dream PC continues to deliver top-notch cooling and performance. Follow these simple steps to keep your liquid cooling loop in pristine condition:
1. Regular Cleaning:
To maintain optimal performance, it is crucial to clean your liquid cooling loop periodically. Drain the coolant and remove any accumulated dust or debris from the tubing, radiator, and water blocks. Use a soft brush or compressed air to carefully clean the components, ensuring there is no obstruction that could affect the flow of liquid. Once cleaned, refill the loop with fresh coolant for optimal cooling efficiency.
2. Coolant Inspection:
Regularly inspect the condition of your coolant to ensure it remains free from contaminants. Over time, the coolant may collect impurities that can clog the loop or lead to the development of bacteria. Check the color and clarity of the coolant, and if it appears cloudy or discolored, it’s time for a coolant flush. Replace the old coolant with a high-quality, compatible product to maintain the best thermal performance.
3. Monitoring and Troubleshooting:
Keep a close eye on your liquid cooling loop’s performance by monitoring the temperatures of your CPU and GPU. Utilize software that provides real-time monitoring to help identify any fluctuations or high temperatures that may indicate an issue. If you encounter problems such as leaks, noise, or poor cooling efficiency, start troubleshooting by checking for loose connections and ensuring the pump is functioning correctly. Refer to the manufacturer’s guidelines or seek assistance from an experienced PC builder if needed.
Understanding the Pros and Cons: Evaluating the Benefits and Trade-offs of Custom Liquid Cooling Loops
Custom liquid cooling loops provide a range of benefits that can enhance your PC’s performance and aesthetics. Let’s explore the pros you can expect:
- Superior Cooling Efficiency: Unlike air cooling, liquid cooling systems can effectively dissipate heat from your PC’s components, allowing them to run cooler and potentially boosting their longevity.
- Overclocking Potential: By maintaining low temperatures, custom liquid cooling loops provide a reliable foundation for overclocking your CPU and GPU, squeezing out those extra megahertz and achieving peak performance.
- Silent Operation: Liquid cooling systems tend to generate less noise compared to their air cooling counterparts, allowing you to enjoy your PC’s power without the distracting hum of fans.
However, it’s important to weigh these benefits against the trade-offs:
- Complexity: Building and maintaining a custom liquid cooling loop can be quite intricate, demanding time and effort for installation as well as regular maintenance to prevent leaks or pump failures.
- Cost: Custom liquid cooling setups can be pricey. You’ll need to invest in high-quality components, such as water blocks, radiators, pumps, and tubing, which can significantly add to the overall cost of your PC build.
- Space Requirements: Liquid cooling systems often require additional space within your PC case to accommodate the radiators and reservoirs, and may limit the number of expansion slots available for other components.
Key Takeaways
As we reach the end of this step-by-step journey into custom liquid cooling loops and building your dream PC, we hope you now feel equipped to embark on this exciting endeavor. Undoubtedly, the road to mastering custom liquid cooling can be a challenging one, but with patience, determination, and a touch of creativity, the rewards are extraordinary.
Remember, as you dive into the mesmerizing world of custom liquid cooling, let your imagination soar. This is your chance to design a PC that perfectly reflects your personality and meets your every need. From dazzling color schemes to mind-blowing cooling capabilities, the possibilities are limited only by your imagination.
As you carefully craft and assemble your custom liquid cooling loops, embrace the power of learning from mistakes. Every setback is an opportunity for growth and a chance to further sharpen your skills. Don’t be discouraged if the first attempt doesn’t produce the desired results - great things rarely come without a few hiccups along the way.
Seek out the support and knowledge of the vibrant PC building community. Share your successes, seek advice, and contribute your newly-earned wisdom. Together, we can elevate the art of custom liquid cooling and inspire others to join our ranks.
Now, armed with this comprehensive guide, unleash your inner innovator and embrace the mystique of custom liquid cooling. With each whir of the fans and the gentle hum of liquid flowing through your meticulously crafted loops, a masterpiece will come to life before your eyes.
So, go forth and build. Build with confidence, build with creativity, and build with passion. Your dream PC awaits – an extraordinary fusion of art, science, and sheer computing power.
May your journey be filled with excitement, discovery, and the satisfaction of creating something truly unique. Happy building!